

How to publish your own React component library to npm
Using create-react-library.


Publishing your own react component library is actually simple than you think. In this blog, I'll show you how to do it in the simplest way possible.
Now Let's get started...
Prerequisite:
There are many ways to get started but here we are going to use create-react-library. Using this package Rollup.js, Babel, and other configurations are handled automatically for us.
Step 1:
npx create-react-library <package-name>
Step 2:
Enter all the details related to this package like
- Package name
- Package description
- Author's GitHub Handle
- Github repo path
- Select License
- Package Manager - (npm or yarn)
- Template
Note: When a user creates a user or organization account, they are granted a scope that matches the user/organization name. The scope is useful in the following scenario.
- When you want to create a package with the same name as a package created by another user or organization without conflict. Eg. with scope:
@username/xyz-app, without scope:xyz-app. read more- When you want to logically group certain packages.
There are three options available for the templates:
- Default: Use this option if you want to create the package in javascript.
- Typescript: Use this option if you want to create the package in typescript.
- Custom: Use this option if you want to use a custom template.
Step 3:
Now let's start the development of our package.
This will be the folder structure available to us.
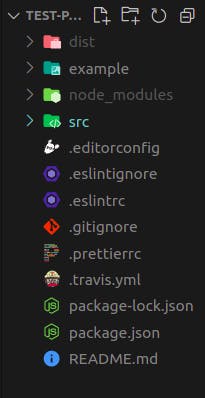
Local development can be separated into two parts.
- src/ folder will contain code for react package that we are creating.
- example/ will contain code for a demo application where we can test our react package
First, we will start rollup, this will help us to automatically recompile our package to the dist/ folder.
Note: Rollup is a module bundler for JavaScript which compiles small pieces of code into something larger and more complex, such as a library or application
npm start
Next, we will navigate to example/ and start the demo application. Here we will be able to import the package present in src/ and test it here.
cd example
npm start
Step 4:
Start development of the package. Now, anytime you make a change to your library in src/ or to the example app's example/src, create-react-app will live-reload your local dev server so you can iterate on your component in real-time.
Note: Make sure that any npm modules you want as peer dependencies are properly marked as peer dependencies in package.json. The rollup config will automatically recognize them as peers and not try to bundle them in your module.
Step 5:
Run npm login command and enter your credentials to log in.
npm login
Step 6:
This is the final step. If you are publishing a package privately you can directly run the
following command.
npm publish
But if you are creating a public package there are few things that you can keep in mind.
- Have easy-to-understand documentation that explains steps for installation, getting started, configuration, and other necessary stuff required while development.
- Share the link for a working demo of your package.
- Add instructions about how other developers can contribute to this package.
Here is one way you can showcase a working demo. Just push all the changes to GitHub and run the following command.
npm run deploy
This will publish our example app to Github pages.
Finally, run this command.
npm publish
Note:
- If you are publishing the package publically its name should be unique.
- There is a charge of 7$ if you want to publish a private package to npm. You can refer to this article if you want to publish a private package for free. Link to Article
If you want to publish scoped package publically run this command
npm publish --access=public
And we are done, Congratulations!!! your react package is now published on npmjs.com.